上一篇字数过多,所以分成了两份
Axios网络请求
在实际项目中,前端页面所需的数据往往需要从服务端获取,这必然涉及与服务器的通信
Axios是一个基于promise网络请求库,作用于node.js和浏览器中
Axios在浏览器端使用XMLHttpRequests发送网络请求,并能自动完成JSON数据的转换,后端接收的是json格式
安装
import axios from 'axios'
http://www.axios-http.cn/
发送get,post请求
axios.get ('/user?ID=123' ) .then (function (response ){ console .log (response); }) .catch (function (error ){ console .log (error); }) .then (function ( });
post请求
axios.post ('/user' ,{ firstName :'Fred' , lastName :'Flintstone' }) .then (function (response ){ console .log (response); }) .catch (function (error ){ console .log (error); });
async/await,解决异步回调问题,使异步操作以同步的方式去执行
async function getUser ( try { const response = await axios.get ('/user?ID=123' ); console .log (response.data ); }catch (error){ console .error (error) } }
其他请求方式
参考:http://axios-http.com/zh/docs/req_config
axios ({ method :'post' , url :'/user/123' , data :{ firstName :'Fred' , lastName :'Flintstone' } }); axios.get (url[,config]) axios.delete (url[,config]) axios.post (url[,data[,config]])
程序生命周期的流程,当你使用它时,程序被创建,然后渲染到页面上去(挂载or绑定),当切换页面时,它就会被销毁,可以写在scripts中,与data,components等同级
created :function (console .log ("程序被创建" )}updated :function (log ("更新" )}mounted :function (console .log ("组件完成初始渲染并创建 DOM 节点后运行代码--" )}
我们现在把请求发送给后端去查询用户,在这之前我们要修改后端web服务器的端口,因为后端的端口号和前端的vue端口号都是8080相冲突,修改application.properties
修改app.vue文件,添加axios网络请求
created :function ( axios.get ('http://localhost:8080/user' ).then (function (response ){ console .log (response) }) }, mounted :function ( console .log ("组件完成初始渲染并创建 DOM 节点后运行代码--" ) },
查看控制台输出
我们把get请求放在created方法体下,但是控制台先执行了了挂载点的渲染,再从控制台输出response,这是因为异步的原因。排在异步任务后面的代码,不用等待异步任务结束会马上运行,异步任务不具有阻塞效应
异步任务是不在主线程上的,在任务队列里面,要等主线程上的任务运行完了,才开始运行异步任务,同步任务就是主线程上的任务,只有前一个运行完了,才能运行下一个。
然后这里出现了报错200,这是出现了跨域问题,为何会出现这个问题呢
为了保证浏览器的安全,不同源的客户端脚本再没有明确授权的情况下,不能读写对方资源,称为同源策略,同源策略是浏览器安全的基石
同源策略是一种约定,他是浏览器最核心也是最基本的安全功能
所谓同源(即指再同一个域)就是两个页面具有相同协议,,主机和端口号。
当一个请求url的协议,域名,端口三者之间任意一个与当前页面url不同即为跨域,此时无法读取非同源网页的Cookie,无法向非同源地址发送AJAX请求
前端的端口是8080,但是后端的端口是8088.所以两者不同源
跨域问题的解决
CORS是由W3C指定的一种跨域资源共享技术标准,目的就是为了解决前端的跨域请求
CORS可以在不破坏即有规则的情况下,通过后端服务器实现CORS接口,从而实现跨域通信
CORS将请求分为两类:简单请求和非简单请求,分别对跨域通信提供了支持
简单请求:
请求方法:GET,POST,HEAD
除了以下的请求头字段之外,没有自定义的请求头
Accept,Accept-Language,Content-Language,Last-Event-ID,Content-Type
Content-Type的值只有以下三种:
text/plain,multipart/form-data,application/x-www-form-urlencoded
非简单请求:不满足简单请求的策略就是非简单请求,可能有自定义的请求头
简单请求的服务器处理 CORS的策略是请求时在请求头中增加一个Origin字段
Host:localhost:8080  后端的地址
Origin:http://localhost:8081  前端传过来的地址
Referer:http://localhost:8081/index.html
服务器收到请求后,根据该字段判断是否允许该请求访问,如果允许,则在HTTP头信息中添加Access-Control-Allow-Origin字段
Access-Control-Allow-Origin:http://localhost:8081
Content-Length:20
Content-Type:text/plain;charset=UTF-8
Date:Thu,12 Jul 2018 xxxxxxx
非简单请求 对于非简单请求的跨源请求,浏览器会在真实请求发出前增加一次OPTION请求,称为预检请求
预检请求将真是请求中的信息,包括请求方法。自定义字段,源信息添加到HTTP头信息字段中,询问服务器是否允许这样的操作
例如一个GET请求
OPTIONS /test HTTP/1.1
Origin:http://www.test.com
Access-Control-Request-Method:GET 表示请求使用的HTTP方法
Access-Control-Request-Headers:X-Custom-Header 包含请求的自定义头字段
Host:www.test.com
服务器收到请求时,分别对Origin,Access-Control-Request-Method,Access-Control-Request-Headers进行验证,通过之后,会在返回HTTP头信息中添加
Access-Control-Allow-Origin:http://www.text.com
Access-Control-Allow-Methods:GET,POST,PUT,DELETE 真实请求允许的方法
Access-Control-Allow-Headers:X-Csutom-Header 真实请求允许的字段
Access-Control-Allow-Credentials:true  是否允许用户发送,处理cookie,跨域cookie也不能共享
Access-Control-Max-Age:1728000 预检请求的有效期,单位s,有效期内不会重复发送
具体解决
可以通过过滤器统一配置,加一个CorsConfig配置类,这样就是全局配置
@Configuration public class CorsConfig implements WebMvcConfigurer { @Override public void addCorsMappings (CorsRegistry registry) { registry.addMapping("/**" ) .allowedOrigins("*" ) .allowedMethods("POST" ,"GET" ,"PUT" ,"OPTIONS" ,"DELETE" ) .maxAge(168000 ) .allowedHeaders("*" ) .allowCredentials(true ); } }
在对应的控制器上加上@CrossOrign就可以,使控制器中所有的方法都能跨域
现在用表格输出
注意一点:
axios.get ("http://localhost:8088/user" ).then (function (response ){ this .tableData = response.data }) axios.get ("http://localhost:8088/user" ).then ((response )=> { this .tableData = response.data })
与Vue整合 设想我们后端端口号变化,要去改动每一个请求方式中的地址,很是麻烦,每一个组件也都要导入axios,每一次发起请求都需要填写完整请求路径,我们可以通过全局配置方式解决上述问题
修改main.js
import axios from 'axios' axios.defaults .baseURL = 'http://localhots:8088' Vue .prototype $http = axiosapp.config .gloablProperties .$http =axios
import axios from 'axios' created :function ( axios.get ('http://localhost:8088/user' ).then ((response )=> this .tableData = response.data ) }, created :function ( this .$http .get ('/user' ).then ((response )=> this .tableData = response.data ) },
前端路由VueRouter 安装与使用 Vue路由:vue-router能够轻松的管理SPA(单页面)项目中组件的切换,新建项目
npm install vue-router@4(适配vue3)
npm install vue-router@3(适配vue2)
创建组件 Discover.vue,Friends.vue,My.vue
<template>
    <div>
        <h1>发现音乐</h1>
          <!-- 其余两个组件自定义内容 -->
    </div>
</template>
创建路由模块,创建router文件夹,router文件夹下创建index.js
import VueRouter from "vue-router" ;import Vue from "vue" ;import Discover from '../components/Discover.vue' ;import Friends from '../components/Friends.vue' ;import My from '../components/My.vue' ;Vue .use (VueRouter )const router = new VueRouter ({ routes :[ {path :'/' ,redirect :'/discover' }, {path :'/discover' , component :Discover }, {path :'/friend' , component :Friends }, {path :'/my' , component :My }, ] }) export default router
再app.vue中写入链接
<template>
  <div id="app">
    <h1>App组件</h1>
    <!-- 声明路由链接 -->
    <router-link to="/discover">发现音乐</router-link>
    <router-link to="/my">我的音乐</router-link>
    <router-link to="/frined">关注</router-link>
    <!-- 声明路由占位符标签 当我们点击相应的组件,组件里的内容就会被渲染到router-view -->
    <router-view></router-view>
  </div>
</template>
再main.js中配置
import Vue from 'vue' import App from './App.vue' import router from './router/index' Vue .config .productionTip = false new Vue ({ render : h =>h (App ), router :router }).$mount('#app' )
子路由 再discover.vue下添加 子路由链接,创建toplist.vue和palylist.vue
<template>
    <div>
        <h1>发现音乐</h1>
        <!-- 子路由链接 -->
        <router-link to="/discover/toplist">推荐</router-link>
        <router-link to="/discover/playlist">歌单</router-link>
    </div>
</template>
再index.js中导入,嵌套声明子路由
import VueRouter from "vue-router" ;import Vue from "vue" ;import Discover from '../components/Discover.vue' ;import Friends from '../components/Friends.vue' ;import My from '../components/My.vue' ;import Toplist from '../components/Toplist.vue' ;import Playlist from '../components/Playlist.vue' ;Vue .use (VueRouter )const router = new VueRouter ({ routes :[ {path :'/' ,redirect :'/discover' }, {path :'/discover' , component :Discover , children :[ {path :"toplist" ,component :Toplist }, {path :"playlist" ,component :Playlist }, ] }, {path :'/friends' , component :Friends }, {path :'/my' , component :My }, ] }) export default router
动态路由 把hash地址中可变的部分定义为参数项,从而提高路由规则的复用性,再vue-router中使用英文的冒号(:)来定义路由的参数项目,比如说商品的跳转,我们需要复用一些组件
修改my.vue
<template>
    <div>
        <h1>我的音乐</h1>
        <router-link to="/my/1">商品1</router-link>
        <router-link to="/my/2">商品2</router-link>
        <router-link to="/my/3">商品3</router-link>
        <router-view></router-view>
    </div>
</template>
创建Product.vue
<template>
    <div>
        <!-- 获取动态的id值 -->
        <h1>商品{{ $route.params.id }}</h1>
    </div>
</template>
修改index.js,导入prodect组件,添加my的子路由
{path :'/my' , component :My , children :[ {path :":id" ,component :Product }, ] },
为了简化路由参数的获取形式,vue-ruter允许再路由规则中在其props传参,示例
在index.js中加入props属性
{path :'/my' , component :My , children :[ {path :":id" ,component :Product ,props :true }, ] },
修改Product.vue
<template>
    <div>
        <!-- 获取动态的id值 -->
        <h1>商品{{ id }}</h1>
    </div>
</template>
<script>
export default {
    props:["id"]
}
</script>
跳转补充 除了创建a标签定义导航链接,还可以借助router.push方法,这个方法会向history栈添加一个新的记录,用户点击后退按钮,则会返回之前的URL。点击此方法会在内部调用
<template>
    <div>
        <button @click="gotoMy">跳转到我的音乐</button>
    </div>
</template>
<script>
export default {
    methods: {
        gotoMy:function(id){
            this.$router.push('/movie/${id}')//可自定义
        }
    }
}
</script>
导航守卫 我们在所有路由跳转之前都要经过一个router.beforeEach的方法,可以控制路由的访问权限,类似于后端中的拦截器。,你可以用router.beforeEach注册一个全局前置守卫
router.beforeEach((to,from,next) => {
<!-- 如果用户想跳转到此路径,但是他没有通过验证,那就跳转到login页面-->
	if(to.path === '/main' && !isAuthenticated){
		next('/login')
	}else{
		next()
	}
})
to:即将要进入的目标
from:当前导航正要离开的路由
在守卫方法中如果声明了next形参,则必须调用next()函数,否则不允许用户访问全部路由
直接放行:next()
强制其停留在当前页面:next(false)
强制其跳转到登陆页面:next(‘/login’)
状态管理VueX Vuex介绍 在多层嵌套的父子组件之间传递十分繁琐,兄弟组件无法直接共享数据,提供了使用全局的状态管理器,将所有分散的共享数据交由状态管理其保管-vuex。把数据都抽到一个地方,每个组件要获取数据时,都要此地方获取
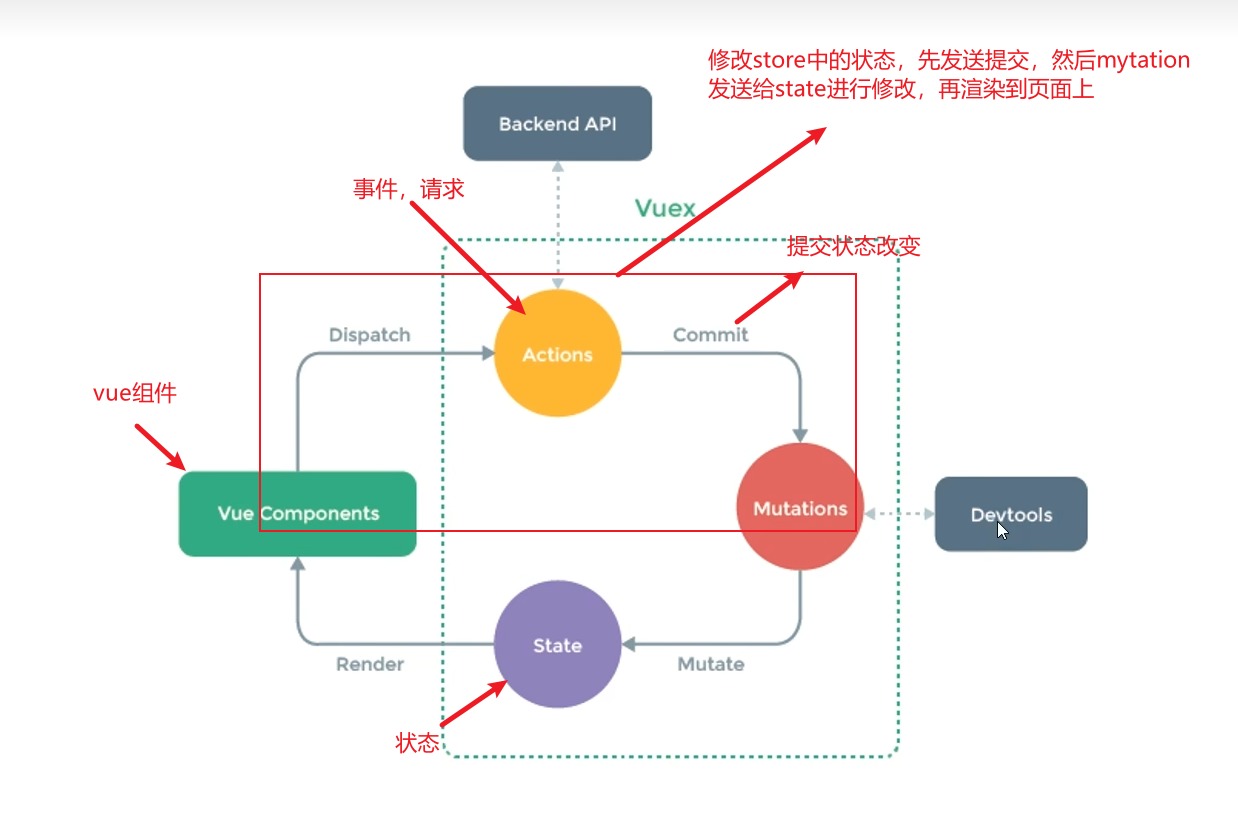
vuex是一个状态管理库,采用集中式存储管理应用的所有组件的状态,管理分散在Vue各个组件中的数据,在复杂的项目中会用到vuex , state,action,mutation,getter,module五个概念
核心是一个store,当store状态发生变化时,与之绑定的视图也会被重新渲染。store中的状态不能被直接修改,需要显式地提交(commit) mutation,这可以让我们方便的跟踪每一个状态的变化
组件通过读取state数据进行渲染,一些异步的请求需要通过dispatch的方式触发action,action拿到数据后就可以commit给mutations,就有了记录,去修改state。
State State用于维护所有应用层的状态,并确保应用只有唯一数据源,在组件中,可以直接使用this.$store.state.count访问数据,也可以先用mapState辅助函数将其映射下来。
安装:npm install vuex@next vuex3和vuex4的语法不同,具体查看官方文档
main.js中导入vuex
import Vuex from 'vuex' Vue .use (Vuex )
在新store文件夹下,新建index.js
import Vue from "vue" import Vuex from "vuex" Vue .use (Vuex )const store = new Vuex .Store ({ state :{ count :0 }, mutations :{ increment (state){ state.count ++ } } }) export default store
在main.js中进行注入,在任意组件就可以在store中取值
import Vue from 'vue' import App from './App.vue' import Vuex from 'vuex' import store from "./store/index.js" Vue .use (Vuex )Vue .config .productionTip = false new Vue ({ render : h =>h (App ), store :store, }).$mount('#app' )
<!--通过此方式来获取state中的值 -->
<template>
  <div class="hello">
    <!--{{ this.$store.state.count }} 原始写法,以下简写-->
     {{count}}
    <button @click="add">+1</button>
  </div>
</template>

<script>
export default {
  name: 'HelloWorld',
  computed:{ //在此处添加一个方法,就可以简写
      count(){
        return this.$store.state.count
      }
  },
  methods:{
    add(){
        //通过commit方法来调用 mutations中的方法
      this.$store.commit("increment")
    }
  }
}
</script>
**this.$store,$**的含义:
挂载在this上的vue内部属性一个特殊标记。增强区分的,来说明这是内置的实例方法属性,内部 api 的命名空间,带 $ 的是 VUE 框架(或插件)定义的属性方法,为了与自定义的方法更好的区分
当一个组件需要获取多个状态时,这些状态都声明有些重复和冗余,我们可以使用mapState辅助函数帮助我们解决此问题
<template>
  <div class="hello">
    {{ count }}
    <button @click="add">+1</button>
  </div>
</template>

<script>
import { mapState } from 'vuex'
export default {
  name: 'HelloWorld',
  computed:mapState({
    count:state => state.count,

    /*最简便的写法 属性名和state子节点名称相同时
    映射this.count 为 store.state.count
    */
    // 'count',

  //传递字符串参数 'count' 等同于 'state => state.count'
  countAlias:'count',

  //为了能够使用 'this' 获取局部状态,必须使用常规函数
  countPlusLocalState (state){
    return state.count + this.localCount
  }
  }),
  methods:{
    add(){
      this.$store.commit("increment")
    }
  }
}
</script>

<style scoped>

</style>
Getter 维护由State派生的一些状态,这些状态随着State状态的变化而变化,直接使用this.$store.getter.doneTodos,也可以mapGetters辅助函数将其映射下来,帮state中的数据做进一步的过滤和处理
state中添加待办事项和方法
state :{ count :0 , todos : [ { id : 1 , text : '你好' , done : true }, { id : 2 , text : '大家好' , done : false } ] }, getters : { doneTodos : state => return state.todos .filter (todo =>done ) } }
修改HelloWorld.vue
<template>
  <div class="hello">
    {{ count }}
    <button @click="add">+1</button>
   <ul>
    <li v-for="todos in doneTodos" :key="todos.id">{{ todos.text }}</li>
   </ul>
  </div>
</template>
<script>
import { mapState } from 'vuex'
export default {
  name: 'HelloWorld',
    computed: {
        //通过属性访问
      doneTodos () {
         return this.$store.getters.doneTodos
       }
  },
}
</script>
通过mapGetters辅助函数访问,修改htlloworld.vue的computed部分
computed :{ ...mapState ([ 'count' ,'todos' , ]), ...mapGetters ([ 'doneTodos' ]), },
Mutation 在组件中,可以直接使用store.commit来提交mutation,也可以用mapState辅助函数将其映射下来,Mutation只能做同步的操作,要做异步操作的话,所以抽象出Action的概念,如果在mutation中做异步的操作是无法被记录的
store.commit提交
<template>
  <div class="hello">
    {{ count }}
    <button @click="add">+2</button>
  </div>
</template>

<script>
import { mapGetters, mapState } from 'vuex'
export default {
  name: 'HelloWorld',
  computed:
    ...mapState([
    'count',
   ]),
  },

  methods:{
    add(){
        //可以在此传参
      this.$store.commit("increment",2)
    }
  }
}
</script>
修改index.js,添加形参
mutations :{ increment (state ,n){ state.count = state.count +n } },
使用mapMutation辅助函数将组件中的methods映射为store.commit调用(需要根节点注入store)
methods :{ ...mapMutations ([ 'increment' ]), add ( this .increment (2 ) } }
mutation都是同步事务,为了处理混合异步调用使用action
Action Action类似于Mutation,不同于,action不能直接修改状态,只能通过提交mutation来修改,Action可以包括异步操作,在action能够通过commit记录state的变化
直接使用this.$store.dispatch(‘xxx’)分发action,或者使用mapActions辅助函数先将其映射下来
注册action
actions : { increment (context){ context.commit ('increment' ) } }
通过 store.dispatch方法触发
store.dispatch ('increment' , { amount : 10 })
也可以在组件中使用this.$store.dispatch('xxx') 分发 action,或者使用mapActions辅助函数组件的methods映射为store.dispatch
Module 由于使用单一状态树,应用的所有状态会集中到一个比较大的对象。当应用变得非常复杂时,store 对象就有可能变得相当臃肿。
为了解决以上问题,Vuex 允许我们将 store 分割成模块(module) 。每个模块拥有自己的 state、mutation、action、getter、甚至是嵌套子模块——从上至下进行同样方式的分割:(太难整理。直接复制官方文档了)
const moduleA = { state : () => ({ ... }), mutations : { ... }, actions : { ... }, getters : { ... } } const moduleB = { state : () => ({ ... }), mutations : { ... }, actions : { ... } } const store = createStore ({ modules : { a : moduleA, b : moduleB } }) store.state .a store.state .b
前端数据模拟MockJS 是一款拦截Ajax请求再生成随机数据响应的工具,可以用来模拟服务器响应 的工具,可以用来模拟服务器响应。
组件中调用mock.js中的模拟数据接口,返回的response就是mock.js中Mokc.mock(’url‘,data)中设置的data
安装: npm install mockjs
核心方法Mock.mock(rurl?,rtype?,template|function(options))
rurl:表示需要拦截的url,可以是url字符串或者url正则
rtype:表示需要拦截的ajax请求,例如get,post,put,delete等
template:表示数据模板,可以是对象或字符串
function:表示用于生成响应数据的函数
设置延时请求到数据
Mock .setup ({ timeout :400 })
项目中创建mock目录,新建index.js ,然后在main.js中导入
import Mock from 'mockjs' Mock .mock ('/product/search' ,{ "ret" :0 , "data" : { "mtime" :"@datetime" , "score|1-800" :800 , "rank|1-100" :100 , "stars|1-5" :5 , "nickanme" :"@cname" , "img" :"@image('200px*100px','#ffcc33','#FFF','png','Fast Mock')" } })
main.js导入index.js: import ‘./mock/index.js’
在app.vue中发送get请求,记得安装axios,我们就可以获取mock中的图片
<template>
  <div id="app">
    <img :src="img">
  </div>
</template>
<script>
import axios from 'axios'
export default {
  name: 'App',
  data(){
    return{
      img:""
    }
  },
  components: {

  },
  mounted () {
    axios.get("/product/search").then(res => {
      console.log(res)
      this.img = res.data.data.img
    })
  }
}
</script>
数据生成规则,数据模板中的每个属性由3部分构成:属性名name,生成规则rule,属性值value:
属性值是字符串String
'name|min-max' :string'name1|1-3' :'a' -> aa 'name|count' :string
属性是数字Number
'name|+1' :number'name|min-max' :number'name|min-max,dmin-dmax' :number
属性值是布尔类型Boolean
'name|1' :boolean'name|min=max' :value
属性值是对象Object
'name|count' :object'name|min-max' :object
属性值为数组Array
'name|1' :array'name|+1' :array'name|min-max' :array'name|count' :array
属性值为函数function
'name' :function var fun =function (x ){ return x+10 } var data =Mock .mock ({ 'name' :fun (10 ) })
占位符 @
'mtime' :"@datatime" ,'s' :"@natural(1,800)" ,'nickname' :"@cname" ,'img' :"@image('200px*100px','#ffcc33','#FFF','png','Fast Mock')"
Mock.Random 用于生成随机数据
var Random = Mock .Random Random .email ()Mock .mock ('@email' )
当路径里面传参时,需要在index.js中加入正则才能生效
mounted () { axios.get ("/product/search?id=12" ).then (res => console .log (res) this .img = res.data .data .img }) }
修改index.js
Mock .mock (RegExp ('/product/search.*' ),{ "ret" :0 , "data" : { .. } })
Vue-Element-admin 典型管理员业务模型,点击此处跳转到官方文档
先去官网下载其源码并运行,安装方法看官方文档,因为此处安装node_modules需要python2的环境,运行时注意node.js的版本 高版本可能运行不了,所以以下是我打包的源文件(里有node_modules),需要的自取
https://pan.quark.cn/s/265c5ba8522c 提取码:5ySe
views下放的大多为页面组件,components下用的大多为复用组件
具体流程 看视频ba:【1天搞定SpringBoot+Vue全栈开发】https://www.bilibili.com/video/BV1nV4y1s7ZN?p=15&vd_source=d6565691506d01ce8bc916acd69f6e85
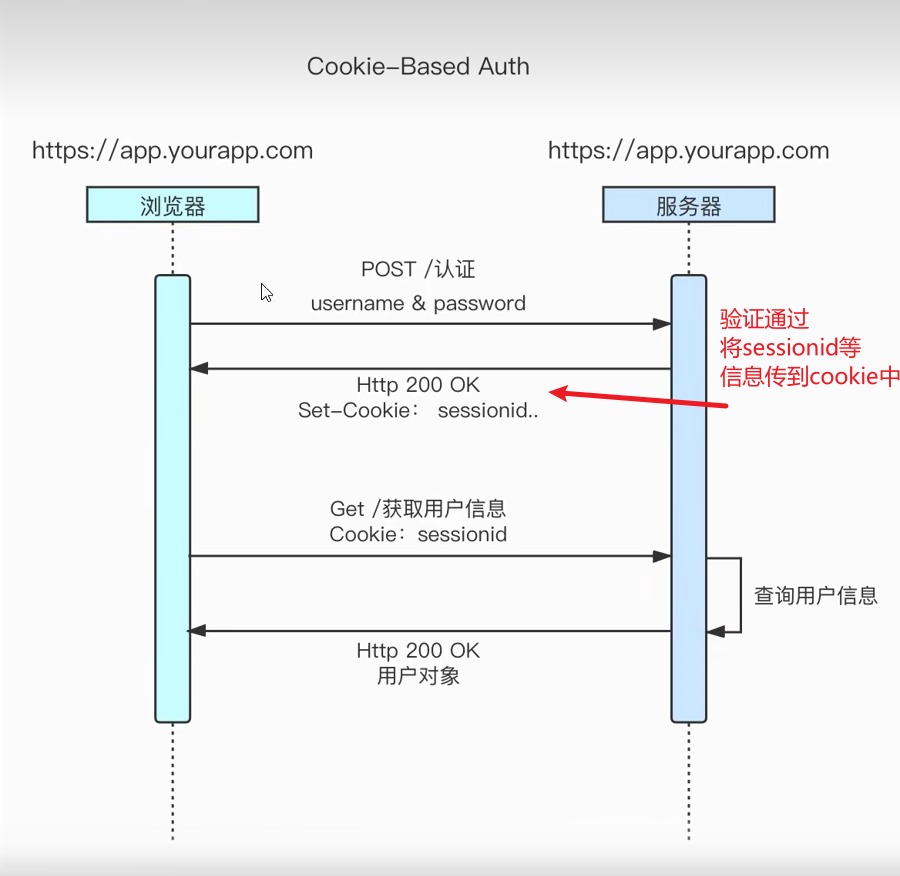
JWT跨域认证 Session认证
用户向服务器发送用户名密码
验证通过后,在当前对话session保存相关数据,比如用户角色,登陆时间
服务器向用户返回session_id ,写入用户cookie
用户随后的每一次请求,都会通过Cookie,将session_id传回服务器
服务器收到session_id,就可以知道用户的身份
session认证的缺点:拓展性不好,如果服务器集群,或者是跨域的服务导向架构,就要求session数据共享,每台服务器都能读取session,两种解决方法
session数据持久化,写入数据库或别的持久层,服务器收到请求后,都向持久层请求数据,优点:架构清晰,缺点工程量大
服务器不保存session数据,所有数据保存在客户端,每次请求都发回服务器,Token认证就是代表
Token认证 Token是服务端产生的一串字符串,是客户端访问资源接口(API)时所需要的资料凭证,token是一个客户端一个,session是一个用户一个,可以理解为token就是将用户信息进行加密了,然后通过加密信息传给服务器解析
客户端使用用户名跟密码,服务端收到请求,去验证用户名与密码
验证成功,服务端会生成一个token并发送给客户端
客户端收到后存在cookie或localStorage中
客户端每次向服务端请求资源时,都需要带着此token,服务端验证成功后才返回请求的数据
JWT JSON Web Token 是一个token的具体实现方法,原理:服务器认定以后,生成JSON对象,发回给用户,为防止用户篡改数据,服务器在生成对象时,会加上签名
由三部分组成 Header(头部).Payload(负载).Signature(签名) 三部分最终组合为字符串,用“.”分开
Header 部分是一个JSON对象,描述JWT的元数据
{ "alg" : "HS256" "typ" : "JWT" }
alg属性表示前面的算法,默认是HS256,type表示token的类型。将上面json对象使用Base64URL算法转换成字符串
Payload部分也是一个JSON对象,用来存放实际需要传递的数据,规定7个官方字段供选
iss:签发人
exp:过期时间
sub:主题
aud:受众
nbf:生效时间
iat:签发时间
jti:编号
base64enc({ "iss" : "xx.com" "exp" : 123123123 , "company" : "xx" "awesome" : true } )
注意:JWT是默认不加密的,任何人都能读到,使用Base63URL转换成字符串
Signature部分是对前两部分的签名,防止数据篡改,首先需指定一个只有服务器知道的密钥(secret),然后使用Header里面的签名算法,按照以下公式产生签名
HMACSHA256(
	base64UrlEncode(header)+"."+base64UrlEncode(payload),secret
	)
如果负载层数据被篡改了,生成两次的签名也不一样,这样就会出现问题。
Java 实现JWT 添加依赖
<dependency > <groupId > io.jsonwebtoken</groupId > <artifactId > jjwt</artifactId > <version > 0.9.1</version > </dependency >
添加结果类Result和响应码接口ResultCode,User类(可以套用之前的)
public class Result { private Boolean success; private Integer code; private String message; private Map<String,Object> data = new HashMap <>(); public Boolean getSuccess () { return success;} public void setSuccess (Boolean success) { this .success = success;} public Integer getCode () { return code;} public void setCode (Integer code) this .code = code;} public String getMessage () { return message;} public void setMessage (String message) {this .message = message;} public Map<String, Object> getData () {return data;} public void setData (Map<String, Object> data) { this .data = data;} private Result () { } public static Result ok () { Result r = new Result (); r.setSuccess(true ); r.setCode(ResultCode.SUCCESS); r.setMessage("成功" ); return r; } public static Result error () { Result r = new Result (); r.setSuccess(false ); r.setCode(ResultCode.ERROR); r.setMessage("失败" ); return r; } public Result success (Boolean success) { this .setSuccess(success); return this ; } public Result message (String message) { this .setMessage(message); return this ; } public Result code (Integer code) { this .setCode(code); return this ; } public Result data (String key,Object value) { this .data.put(key,value); return this ; } public Result data (Map<String,Object> map) { this .setData(map); return this ; } } public interface ResultCode { public static Integer SUCCESS = 20000 ; public static Integer ERROR = 20001 ; }
添加JwtUtils 用于生成token和解析token
public class JwtUtils { private static long expire = 604800 ; private static String secret = "zxcvbnmasdfghjklqwertyuiopoiuytr" ; public static String generateToken (String username) { Date now = new Date (); Date expiration = new Date (now.getTime() + 1000 * expire); return Jwts.builder() .setHeaderParam("type" ,"JWT" ) .setSubject(username) .setIssuedAt(now) .setExpiration(expiration) .signWith(SignatureAlgorithm.HS512,secret) .compact(); } public static Claims getClaimByToken (String token) { return Jwts.parser() .setSigningKey(secret) .parseClaimsJws(token) .getBody(); } }
添加UserController 添加login方法
@CrossOrigin @RestController public class UserController { @Autowired private UserMapper userMapper; @PostMapping("/login") public Result login (@RequestBody User user) { String token = JwtUtils.generateToken(user.getUsername()); return Result.ok().data("token" ,token); } @GetMapping("/info") public Result info (String token) { String username = JwtUtils.getClaimByToken(token).getSubject(); String url = "https://pic2.imgdb.cn/item/644fb3780d2dde57776adb99.jpg" ; return Result.ok().data("name" ,username).data("avatar" ,url); } }
使用Apipost去发送json格式的请求,username和密码随意,查看返回的响应码和token
{ "success" : true , "code" : 20000 , "message" : "成功" , "data" : { "token" : "eyJ0eXBlIjoiSldUIiwiYWxnIjoiSFM1MTIifQ.eyJzdWIiOiJ6aGFuZ3NhbiIsImlhdCI6MTY5MDIwMzA2MCwiZXhwIjoxNjkwODA3ODYwfQ.uQR4zGrVlAQG8mwicyK6cG0jfUu9lQK-gIDYLqq3VS0hjSeuvhAiG7qB9VpPDRVBCgn0S3dmhnWy2LYjulhFTw" } }
前后端集成 挖个坑,准备先详细学以下js和vue后再来开这个坑